


Choose an LED beam angle by starting with the area or object you want to light and the distance from the fixture. A narrow beam suits a smaller target; a wider beam covers more area. Ceiling height alone is not enough to specify the result: review the fixture’s light distribution, output and position together.
For a commercial project, share the ceiling height, working-plane or display height, target dimensions and lighting layout. Compare suitable LED downlights or track lights, then request a project-specific selection review.
What’s LED Spotlights and Downlights Beam Angle?
For a downlight or spotlight, beam angle is conventionally the angle between the directions where luminous intensity falls to 50% of the peak intensity. It describes the main beam, not a hard boundary beyond which no light is emitted. A narrower beam covers a smaller target at the same distance; a wider beam covers more area. Neither beam angle alone nor its geometric footprint proves uniform illumination.
Why is the Beam Angle Important for LED Lights?
The different types of lights use different beam angles, and the most suitable beam angle often depends on the specific application and setting.
The ranges below are starting points, not fixed design rules. Confirm the final selection against the chosen luminaire’s photometric data and the project layout.
| Beam Angle | Application | Common Uses |
|---|---|---|
| 10°–30° | Accent Lighting | Highlighting artwork, furniture, sculptures, or decor |
| 30°–60° | Task Lighting | Reading areas, kitchen countertops, office desks |
| 60°–120° | General or Ambient Lighting | Living rooms, bedrooms, hallways, large offices, malls |
When selecting the beam angle for LED downlights, what factors should be considered?
Room Size and Layout: Start with the area or object to be lit, the fixture positions and the intended overlap between beams. A large room may need both general lighting and narrow accent beams; a small room does not automatically require a narrow beam. Check coverage and uniformity using the selected luminaire’s photometric data.
Ceiling Height: Use the distance from the luminaire to the working plane or display, not ceiling height alone. Greater distance produces a larger beam footprint for the same angle. Review luminous intensity, target illuminance, spacing and glare before choosing a narrower or wider distribution.
Task or Accent Lighting: Consider the primary purpose of the lighting. For task lighting, such as kitchen countertops or office desks, a narrower beam angle can provide focused illumination. For accent lighting, like showcasing artwork or architectural details, a spotlight with a narrower angle can help draw attention.
Ambiance and Mood: The beam angle influences the mood and ambiance of a room. A narrow beam angle can create dramatic pools of light and shadow, ideal for creating a cozy and intimate atmosphere. A wider beam angle can deliver a softer and more diffused light, suitable for general lighting or a relaxed setting.
Art and Décor: When highlighting specific objects, decorations, or artwork, a spotlight with a narrow beam angle can precisely direct attention to the desired focal points.
Fixture Adjustability: Some fixtures offer adjustable beam angles, allowing you to fine-tune the lighting according to your changing needs or the room’s function.
Combining Beam Angles: For comprehensive lighting, consider using a combination of fixtures with different beam angles to achieve layered illumination. This approach provides both functional and aesthetic benefits.
| Factor | Description | Recommended Beam Angle |
|---|---|---|
| Room Size and Layout | Use target dimensions, fixture positions and beam overlap, not room size alone. | Select the distribution from the target area and photometric layout. |
| Ceiling Height | Use luminaire-to-task distance together with intensity, spacing and target illuminance. | Check the selected luminaire’s photometric data at the actual distance. |
| Task or Accent Lighting | Task lighting requires focus (e.g., desks); accent lighting highlights objects (e.g., artwork). | Narrow (<40°) for tasks and accents. |
| Ambiance and Mood | Narrow beams create dramatic effects; wider beams provide soft, even lighting. | Narrow: Cozy/dynamic; Wide: Relaxed/general. |
| Art and Décor | Highlight specific items or areas with focused beams. | Narrow (<30°) for precise highlighting. |
| Fixture Adjustability | Adjustable fixtures allow flexibility for different uses. | Use fixtures with adjustable beam angles. |
| Combining Beam Angles | Layer different beam angles to balance functional and aesthetic needs. | Mix narrow and wide for layered lighting. |
How to choose the beam angle in lighting application?
Narrow Beam Angle: 8°~25° Suitable for accent lighting, such as lighting highlighting specific objects decorations or display areas;
Medium Beam Angle: Around 30°–45° can be considered for a defined task or display area, subject to mounting distance and the chosen optic. This is not the same as indirect lighting: indirect lighting reaches the space after reflection from another surface. Wall grazing and wall washing require their own optical and placement review.
Wide Beam Angle: around 50°–60°: A wider beam covers more area at the same distance and may suit general lighting or a larger task area. Confirm spacing, illuminance, glare and overlap; the angle alone does not guarantee even coverage.
More than 60°: Broad distributions can support general lighting in commercial interiors. Review fixture spacing and the actual light distribution rather than selecting a wide beam solely because the space is large.
More than 90°: Very wide distributions may suit broad-area lighting, but they are not a general prescription for highlighting artwork. Galleries and museums need separate assessment of the objects, viewing positions, glare and required accent effect.

So how do choose a suitable lighting angle for residential applications & commercial applications in lighting design?
Whenever, when choosing the luminous angle of LED downlights, residential applications, and commercial applications will have some differences according to their different needs and priorities. Reasonably consider the lighting target, lighting area, and desired effect, and choose the appropriate lighting angle to meet the lighting needs of a specific scene.
| Area | Residential Lighting | Commercial Lighting |
|---|---|---|
| Beam Angle |
General and accent distributions selected for the task and layout. |
General and accent distributions selected for the task and layout. |
| Purpose |
Cozy, relaxing ambiancefor living spaces. |
Highlight products, tasks, or architectural details. |
| Room Size | Match coverage to the target area and fixture spacing. | Match coverage to the target area and fixture spacing. |
| Ceiling Height | Review luminaire-to-task distance and photometric data. | Review luminaire-to-task distance and photometric data. |
| Accent Use | Occasional for décor and artwork. | Frequent for displays, signage, and focal points. |
| Fixture Adjustability | Adjustable fixtures allow flexibility for different uses. | Use fixtures with adjustable beam angles. |
| Combining Beam Angles | Layer different beam angles to balance functional and aesthetic needs. | Mix narrow and wide for layered lighting. |
How Does a IES file Reflect Beam Angle?
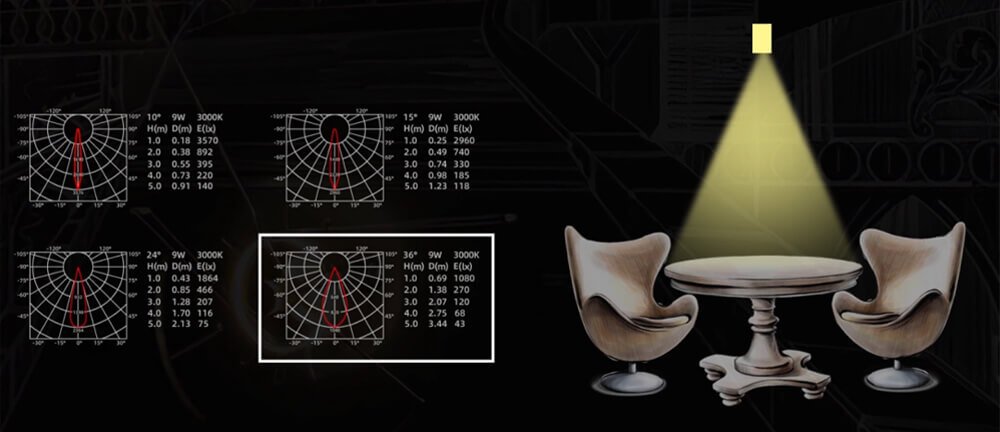
A IES file diagram visually represents the beam angle and light distribution characteristics of a fixture. It shows the variation of light intensity at different angles, making it easy to identify the beam angle.
We offer IES for commonly used beam angles, including 10°, 15°, 24°, and 36°. These diagrams help clients visualize how light is distributed for each beam angle.
The key information is detailed on the right-hand side of the diagram, which provides a clear explanation of the light distribution, intensity, and application for each angle.

Example: How to Choose the Right Beam Angle for a Table?
Scenario 1: Table diameter is 1.5 metres
Goal: assess lighting across the tabletop.
For a nominal 36° beam at a 2 m distance from the luminaire to the tabletop, the geometric beam diameter is approximately 1.30 m: diameter = 2 × distance × tan(beam angle ÷ 2). This does not establish uniform illumination across a 1.5 m table. Check the selected luminaire’s photometric data, fixture spacing and target illuminance before choosing the configuration. A model-specific photometric diagram may show a measured spread that differs from the nominal angle.
Scenario 2: Table diameter is 1 metre
Compare possible 24° and 36° optics at the actual luminaire-to-table distance. A smaller table alone does not establish that either option will provide suitable coverage. Use the selected model’s photometric data to check the intended footprint, illuminance and contrast before selection.

For a brighter centre and darker surroundings, a narrow beam such as 10° may be a starting point. It is not automatically the best choice: check the target dimensions, luminaire-to-task distance and the selected optic’s distribution.
This demonstrates how narrow beam angles are typically used for focused or accent lighting, while wider beam angles are better suited for even illumination.
Product Recommendations
Choosing downlights for a project? Send your room dimensions, ceiling and working-plane heights, lighting purpose, quantity and destination so KLM can review a suitable configuration.


